Wednesday, August 31, 2011

Remove iMesh Toolbar and iMesh search bar (Uninstall Guide)

Don't Copy From This Blog...

Protected by Copyscape Plagiarism Detection
iMesh is probably one of the oldest peer-to-peer file sharing network/software in the world. I'm sure most of you have heard about this software. Before taking a closer look at this P2P software, I think it's worth mentioning that iMesh is not a virus or any other type of malicious software that can infect your machine. However, some people find it difficult to completely remove iMesh from from their computers. Although, iMeshc can be easily uninstalled via Control Panel → Add/Remove (Uninstall), iMesh Toolbar and iMesh search bar must be removed separately. So, when you uninstall iMesh, you also have to uninstall a program called MediaBar. And that's not all, you have to restore your previous homepage and uninstall search provider(search.imesh.com) manually as well. Sounds qquite complicated. Besides, re-installing your web browser probably won't help either. And one last thing, it may add Emoticons for your messenger! icon/shortcut to your Desktop. If you don't know how to remove iMesh Toolbar and iMesh search bar, please follow the steps in the removal guide below. And if you need help removing it, please leave a comment below or just email us. Good luck and be safe online!


iMesh Toolbar and iMesh search bar removal instructions:

1. First of all, download recommended anti-malware software and run a full system scan. It will detect and remove this infection from your computer. You may then follow the manual removal instructions below to remove the leftover traces of this browser hijacker. Hopefully you won't have to do that.


2. Go to the Start Menu. Select Control PanelAdd/Remove Programs.
If you are using Windows Vista or Windows 7, select Control PanelUninstall a Program.


3. Search for MediaBar in the list. Select the program and click Remove button.
If you are using Windows Vista/7, click Uninstall up near the top of that window.


Remove iMesh Toolbar and iMesh search bar in Internet Explorer:

1. Open Internet Explorer. Go to ToolsManage Add-ons.


2. Select Toolbars and Extensions. Uninstall everything related to iMesh Inc. from the list: MediaBar, UrlHelper Class, etc.


3. Select Search Providers. First of all, choose Bing search engine and make it your default search provider. Then select Web Search and click Remove button to uninstall it (lower right corner of the window).
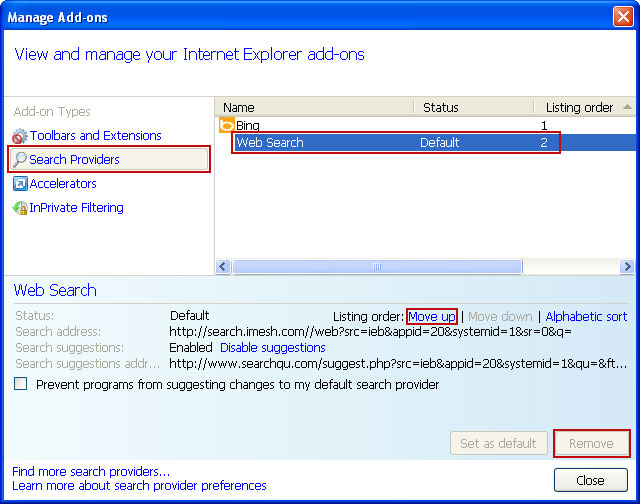


4. Go to ToolsInternet Options. Select General tab and click Use default button or enter your own website, e.g. gooog.com instead of search.imesh.com. Click OK to save the changes. And that's it.


Remove iMesh Toolbar and iMesh search bar in Mozilla Firefox:

1. Open Mozilla Firefox. Go to ToolsAdd-ons.


2. Select Extensions. Choose DataMngr and MediaBar and click Uninstall button.


3. Click the small magnifier icon at the right top corner as shown in the image below. Select Manage Search Engines... from the list.


4. Select Web Search and click Remove button. Click OK to save the changes.


5. Go to ToolsOptions. Under the General tab reset the startup homepage. That's it.


Remove iMesh Toolbar and iMesh search bar in Google Chrome:

1. Click on Customize and control Google Chrome icon and select Options.


2. Change Google Chrome homepage to google.com or any other.


3. Click the Manage search engines... button.


4. Make google.com your default search engine shown in the image below.


5. Select Web Search from the list remove it by clicking the "X" mark as shown in the image below.


Associated Facemoods files and registry values:

Files:
  • C:\Program Files\iMesh Applications\MediaBar\
  • C:\Program Files\iMesh Applications\MediaBar\uninstall.exe
  • C:\Program Files\iMesh Applications\MediaBar\Datamngr\datamngr.dll
  • C:\Program Files\iMesh Applications\MediaBar\Datamngr\datamngrUI.exe
  • C:\Program Files\iMesh Applications\MediaBar\Datamngr\IEBHO.dll
  • C:\Program Files\iMesh Applications\MediaBar\Datamngr\FirefoxExtension\chrome.manifest
  • C:\Program Files\iMesh Applications\MediaBar\Datamngr\FirefoxExtension\chrome.manifest.alt
  • C:\Program Files\iMesh Applications\MediaBar\Datamngr\FirefoxExtension\install.rdf
  • C:\Program Files\iMesh Applications\MediaBar\Datamngr\FirefoxExtension\install.rdf.alt
  • C:\Program Files\iMesh Applications\MediaBar\Datamngr\FirefoxExtension\components\DataMngrHlp.dll
  • C:\Program Files\iMesh Applications\MediaBar\Datamngr\FirefoxExtension\components\DataMngrHlp.xpt
  • C:\Program Files\iMesh Applications\MediaBar\Datamngr\FirefoxExtension\components\DataMngrHlpFF3.dll
  • C:\Program Files\iMesh Applications\MediaBar\Datamngr\FirefoxExtension\content\DnsBHO.js
  • C:\Program Files\iMesh Applications\MediaBar\Datamngr\FirefoxExtension\content\Error404BHO.js
  • C:\Program Files\iMesh Applications\MediaBar\Datamngr\FirefoxExtension\content\NewTabBHO.js
  • C:\Program Files\iMesh Applications\MediaBar\Datamngr\FirefoxExtension\content\overlay.js
  • C:\Program Files\iMesh Applications\MediaBar\Datamngr\FirefoxExtension\content\overlay.xul
  • C:\Program Files\iMesh Applications\MediaBar\Datamngr\FirefoxExtension\content\RelatedSearch.js
  • C:\Program Files\iMesh Applications\MediaBar\Datamngr\FirefoxExtension\content\SearchBHO.js
  • C:\Program Files\iMesh Applications\MediaBar\Datamngr\FirefoxExtension\content\SettingManager.js
  • C:\Program Files\iMesh Applications\MediaBar\Datamngr\FirefoxExtension\content\Settings.xml
  • C:\Program Files\iMesh Applications\MediaBar\Datamngr\FirefoxExtension\content\Settings.xml.alt
  • C:\Program Files\iMesh Applications\MediaBar\Datamngr\ToolBar\chrome
  • C:\Program Files\iMesh Applications\MediaBar\Datamngr\ToolBar\as_guid.dat
  • C:\Program Files\iMesh Applications\MediaBar\Datamngr\ToolBar\dtUser.exe
  • C:\Program Files\iMesh Applications\MediaBar\Datamngr\ToolBar\imeshbandmltbpi.dll
  • C:\Program Files\iMesh Applications\MediaBar\Datamngr\ToolBar\imeshdtxmltbpi.dll
  • C:\Program Files\iMesh Applications\MediaBar\Datamngr\ToolBar\manifest.xml
  • C:\Program Files\iMesh Applications\MediaBar\Datamngr\ToolBar\uninstall.exe
  • C:\Program Files\iMesh Applications\MediaBar\Datamngr\ToolBar\components\windowmediator.js
Registry values:
  • HKEY_CURRENT_USER\Software\DataMngr
  • HKEY_CURRENT_USER\Software\mediabarim
  • HKEY_LOCAL_MACHINE\SOFTWARE\DataMngr
  • HKEY_LOCAL_MACHINE\SOFTWARE\iMeshMediabarTb
  • HKEY_LOCAL_MACHINE\SOFTWARE\Microsoft\Internet Explorer\Toolbar
  • HKEY_LOCAL_MACHINE\SOFTWARE\Microsoft\Windows\CurrentVersion\App Management\ARPCache\iMesh 1 MediaBar
  • HKEY_LOCAL_MACHINE\SOFTWARE\Microsoft\Windows\CurrentVersion\Run "DATAMNGR"
  • HKEY_LOCAL_MACHINE\SOFTWARE\Microsoft\Windows\CurrentVersion\Uninstall\iMesh 1 MediaBar
Share this information with your friends:

Is dinodirect.com a safe and reliable website?

Don't Copy From This Blog...

Protected by Copyscape Plagiarism Detection
I want to buy NextBook Android tablet. I know it has poor quality, but it's cheep and I'm buying it for my kids. I've read some reviews about dinodirect.com, most are bad, usually because of bad customer experience, i.e., taking money, failing to deliver, etc. While others say that they didn't have any problems and their goods were delivered exactly as promised. So, what do you think, should I trust them? Is it a scam or not? Thanks.
Well, it seems that dinodirect.com is not the most safest place to buy electronics and other products on the internet. It may look to good to be true mainly because of very low prices. However, you should keep in mind that they usually sell low quality products. In your case, NextBook Android is definitely going to be a lot worse product than let's say iPad. That's for sure. However, it's up to you whether you want it or not. I've bought Bluetooth Wireless Headset from dinodirect.com a couple of months ago and I got everything in my order, so I must be one of the lucky ones I guess. Although, they took about a month to deliver my order. In general, if you don't trust dinodirect.com you should use PayPal or make another credit card for online purchases. You'll be able to get your money back a lot faster if you use PayPal. If you look at the rating on mywot.com it's somewhat respectable, however, there are many negative reviews. What is more, the company behind dinodirect.com has Better Business Bureau rating of F which is bad. This business is not BBB Accredited. Amazon, Buy.com, Newegg are reliable online stores, you should check whether they have goods you want to buy or not. And only if they don't, you may then consider buying stuff from dinodirect.com and similar online stores.

Tuesday, August 30, 2011

Will Cloud Computing Prompt My Business Free-Fall? Security Concerns in Cloud Computing

Don't Copy From This Blog...

Protected by Copyscape Plagiarism Detection
The latest trend in global technology is implementing and developing programs that work within “The Cloud.” Even traditional services like online fax and word processors are going completely virtual. Of course, as with anything, with the cloud’s dissenters have grown with its popularity. Some shy away from cloud computing, claiming that it’s really not as cheap as it seems when you do the number crunching. And business owners have an even bigger concern: security.

But maybe we shouldn’t be so paranoid. One of the cloud’s biggest “pro’s” is its flexibility — its ability to be tailored to the specific needs of each company. Take advantage of this flexibility without risking the security of your data and your business by looking for a provider who can address all of your concerns. Ask about where they store and access your data, who on their team has access to any of your sensitive information and whether or not your data is segregated from their other customers.
Do your research to make sure that your cloud organization has back-up power. They should have a methodical disaster recovery plan. They also need to have the ability to support you if you need to do an investigation. Finally, they should be financially stable and viable for the long term so that you don’t have to worry about losing your data in the case that they go out of business or merge with someone else. Another thing to think about up front is making sure they would support you if you decide to take your data back in-house or move it to another service provider – in what detail and format would they give you your data or are you locked in for the long term?

The best way to allay your fears of cloud computing security risk? Get smart! Know the details about cloud computing before diving into a specific program. This will allow you to make informed business decisions — decisions that you will feel confident about. If you want to expand your knowledge of cloud computing, reference the “Effectively Using and Securing the Cloud Computing Paradigm” at www.itbusinessedge.com. This presentation, developed by the National Institute of Standards and Technology, will tell you everything you wanted to know about the cloud. To learn more about cloud computing, please read the following article: What Is Cloud Computing? Defining the Cloud.

One way to mitigate security risk is to select a name brand company such as HP or Microsoft as your provider. Another method is to hire a “cloud certified” technology professional such as those trained by CloudSchool.com or 3Tera. The most widely used platform right now is Amazon Web Services, so an AWS certification may be more relevant for you. Trained information technology gurus can help you to implement a variety of cloud solutions in a way that you can trust. Finally, the Cloud Security Alliance (CSA) is a not-for-profit organization that is led by a coalition of industry practitioners and corporations that serves to promote the use of best practices for providing security assurance within Cloud Computing. You can use their website for many security related resources and to identify member companies that are CCSK certified.

Dive into the cloud with full confidence by doing your homework first and ensuring that you can trust your cloud providers.

James Kim is a writer for Choosewhat.com, which provides product reviews and test data for business services and products. Choosewhat.com's goal is to help small companies make informed buying decisions on business solutions that help their business.

СИСТЕМНЫЙ АНТИВИРУС MICROSOFT 2011 / System Antivirus Microsoft 2011

Don't Copy From This Blog...

Protected by Copyscape Plagiarism Detection
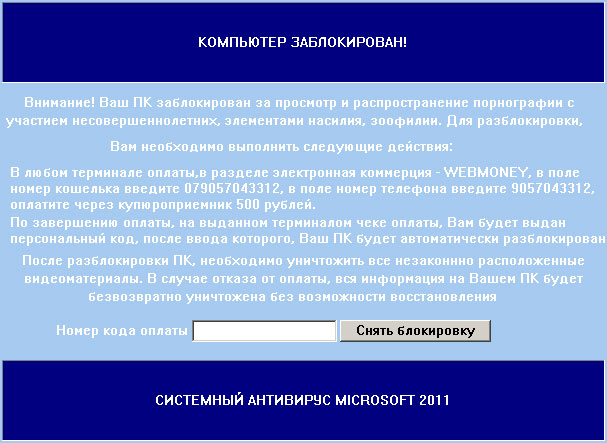
СИСТЕМНЫЙ АНТИВИРУС MICROSOFT 2011 (System Antivirus Microsoft 2011) is a Russian ransomware that prevents you from accessing your files and programs until you pay a fee via SMS text message (500 рублей ~ $17). A code key is require to unlock the computer and regain access. It claims that your computer was blocked because you were watching/downloading illegal videos. СИСТЕМНЫЙ АНТИВИРУС MICROSOFT 2011 malware further states that your files will be deleted if you won't pay the ransom. This category of malware is usually distributed through the use of fake porn websites. You know, the type of websites where you need to install flash player in order to view videos, although, you already have the latest flash player installed on your computer. In this case, cyber crooks targets mostly Russian internet users, however, you may get infected as well, especially if you're looking for some crazy Russian porn, etc. You should visit only safe porn websites. Also, make sure your anti-virus software is updated. Anyway, if your computer is infected with the СИСТЕМНЫЙ АНТИВИРУС MICROSOFT 2011, you can either enter the unlock code or remove it manually. The unlock code is probably not going to happen because they change it very often and besides, those phone numbers work only in Russia. You will have to reboot your computer in Safe Mode with Command Prompt, restore Windows Shell values and remove the malicious executable file. To remove this ransomware, please follow the steps in the removal guide below. Good luck and be safe online!
КОМПЬЮТЕР ЗАБЛОКИРОВАН!

Внимание! Ваш ПК заблокирован за просмотр и распространение порнографии с
участием несовершеннолетних, элементами насилия, зоофилии. Для разблокировки,

Вам необходимо выполнить следующие действия:

В любом терминале оплаты,в разделе электронная коммерция - WEBMONEY, в поле
номер кошелька введите [], в поле номер телефона введите [],
оплатите через купюроприемник 500 рублей.
По завершению оплаты, на выданном терминалом чеке оплаты, Вам будет выдан
персональный код, после ввода которого, Ваш ПК будет автоматически разблокирован.

После разблокировки ПК, необходимо уничтожить все незаконнно расположенные
видеоматериалы. В случае отказа от оплаты, вся информация на Вашем ПК будет
безвозвратно уничтожена без возможности восстановления
СИСТЕМНЫЙ АНТИВИРУС MICROSOFT 2011


СИСТЕМНЫЙ АНТИВИРУС MICROSOFT 2011 malware removal instructions:

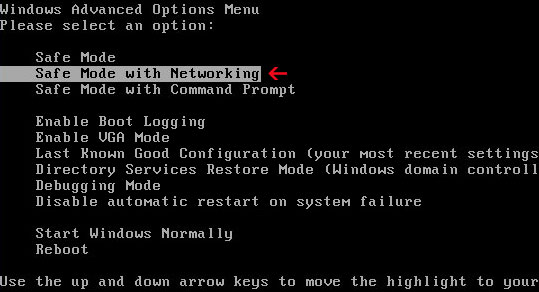
1. Reboot your computer is "Safe Mode with Command Prompt". As the computer is booting tap the "F8 key" continuously which should bring up the "Windows Advanced Options Menu" as shown below. Use your arrow keys to move to "Safe Mode with Command Prompt" and press Enter key. Login as the same user you were previously logged in with in the normal Windows mode. Read more detailed instructions here: http://www.computerhope.com/issues/chsafe.htm


2. When Windows loads, the Windows command prompt will show up as show in the image below. At the command prompt, type explorer, and press Enter. Windows Explorer opens. Do not close it.


3. Then open the Registry editor using the same Windows command prompt. Type regedit and press Enter. The Registry Editor opens.


4. Locate the following registry entries:

HKEY_CURRENT_USER\Software\Microsoft\Windows NT\CurrentVersion\Winlogon\

In the righthand pane select the registry key named Shell. Right click on this registry key and choose Delete.


HKEY_LOCAL_MACHINE\SOFTWARE\Microsoft\Windows NT\CurrentVersion\Winlogon\

In the righthand pane select the registry key named Shell. Right click on this registry key and choose Modify.


Default value is Explorer.exe.


Modified value data points to Trojan Ransomware executable file.


Please copy the location of the executable file it points to into Notepad or otherwise note it and then change value data to Explorer.exe. Click OK to save your changes and exit the Registry editor.

5. Remove the malicous file. Use the file location you saved into Notepad or otherwise noted in step in previous step. In our case, "СИСТЕМНЫЙ АНТИВИРУС MICROSOFT 2011" was run from the My Documents. There was a file called porn_video.exe.

Full path: C:\Documents and Settings\Michael\My Documents\porn_video.exe


Go back into "Normal Mode". To restart your computer, at the command prompt, type shutdown /r /t 0 and press Enter.


6. Download free anti-malware software from the list below and run a full system scan.
NOTE: in some cases the rogue program may block anti-malware software. Before saving the selected program onto your computer, you may have to rename the installer to iexplore.exe, explorer.exe or winlogon.exe. With all of these tools, if running Windows 7 or Vista they MUST be run as administrator. Launch the program and follow the prompts. Don't forget to update the installed program before scanning.

7. If the problem persists, please follow the general Trojan.Ransomware removal guide.


Associated СИСТЕМНЫЙ АНТИВИРУС MICROSOFT 2011 ransomware files and registry values:

Files:
  • [SET OF RANDOM CHARACTERS].exe
Registry values:
  • HKEY_LOCAL_MACHINE\SOFTWARE\Microsoft\Windows NT\CurrentVersion\Winlogon\ "Shell" = "[SET OF RANDOM CHARACTERS].exe"
  • HKEY_CURRENT_USER\Software\Microsoft\Windows NT\CurrentVersion\Winlogon\ Shell" = "[SET OF RANDOM CHARACTERS].exe"
Share this information with other people:

Monday, August 29, 2011

Remove us-srch-system.com (Uninstall Guide)

Don't Copy From This Blog...

Protected by Copyscape Plagiarism Detection
us-srch-system.com is a web search engine/search engine hijacker that may return irrelevant and very often paid search results or redirect users to online surveys, pharmacies, advertisements, etc. It works in exactly the same way as the 100ksearches.com that we have previously reported on our blog. When you google something on your computer it redirects you to a web page somewhat irrelevant to the search. It doesn't matter if you use Internet Explorer, Mozilla Firefox or any other web browser. If you keep getting redirected, your PC is infected with a Trojan horse, adware and/or a rootkit. The last time we encountered us-srch-system.com redirect virus/problem, Microsoft Security Essentials found and removed Win32/AdRotator, TrojanDownloader:Win32/Bebeber.A and TrojanWin32/Sirefef which is a kernel-mode rootkit driver. us-srch-system.com can redirect you to affiliated websites instead of displaying completely unrelated search results as well. Malware that causes these annoying redirects may block legitimate programs and dramatically decrease system performance. It may also display the following error message:
Windows cannot access the specified device, path, or file. You may not have the appropriate permissions to access the item.
To remove the us-srch-system.com hijacker from your computer, please follow the steps in the removal guide below. Hopefully, you'll be able to remove malware from your computer using TDSSKiller and ZeroAccess removal utilities. If you need help removing us-srch-system and associated malware, please leave a comment below. Please provide any additional information you feel is important when removing this malware. Good luck and be safe online!


us-srch-system.com removal instructions

1. Download TDSSKiller and run it. Click Start scan.


2. Click Continue to remove found infections.


3. Reboot your computer to completely remove found malware.


4. Download and run ZeroAccess rootkit removal tool.
5. Download free anti-malware software from the list below and run a full system scan.
NOTE: With all of these tools, if running Windows 7 or Vista they MUST be run as administrator. Launch the program and follow the prompts. Don't forget to update the installed program before scanning.

6. If the problem persists, please read this web document and follow the steps carefully: http://spywareremovalx.blogspot.com/2010/02/remove-google-redirect-virus.html

Share this information with your friends:

Sunday, August 28, 2011

How to Remove PC Repair (Uninstall Guide)

Don't Copy From This Blog...

Protected by Copyscape Plagiarism Detection
PC Repair is a rogue computer optimization program that offers fake system scans and states that a large number of problems — hard drive failures, registry errors — have been found on your computer. In reality, no problems were detected. PC Repair entices you to provide your credit card information and purchase software that you don't actually need. This type of malware is a straight gateway to identity theft, that's why you should never purchase software that looks odd or you don't know where it came from no matter how generic it may look. Only download, purchase, and use software provided by established and well-known vendors. And what do you know about PC Repair? Probably nothing, except this article. Cyber crooks usually use a few common scareware scams: fake online virus scanners, free downloads/warez that actually laden with malicious software, misleading pop-ups and backdoor Trojans that give malware authors "back door" access to your computer. PC Repair is not an exception — it's being distributed using exactly the same methods. It's not a virus, but more like intrusive and annoying software. However, it's still a threat and has to be removed from your computer. If your computer is infected, please follow the steps in the removal guide below to remove PC Repair and associated malware.


PC Repair is not a typical hijack the Desktop/block task manager type of infection. It really messes up the infected computer. First of all, it hides your files and moves to %Temp%\smtmp folder. DO NOT delete files from your Temp folder. Once you delete those files, you won't be able to recover then unless you have a recovery CD or a back-up image of your entire hard drive. Secondly, this rogue program usually comes bundled or drops a rootkit on the infected computer. It is very important to scan your computer for rootkits before removing the rogue program; otherwise will pop-up again. Most of the time, PC Repair drops a rootkit from the TDSS/Alureon family. That's why we recommend scanning your computer with TDSSKiller. For more, information, please follow the removal instructions below.

Additionally, you can activate the rogue program by entering this registration code 8475082234984902023718742058948 and any email as shown in the image below.


Once this is done, you are free to install anti-malware software and remove the rogue anti-virus program from your computer properly. And remember, do not purchase PC Repair. If you have already bought it, please contact your credit card company and dispute the charges. If you have any questions or need additional help removing PC Repair, please leave a comment below or email us. Good luck and be safe online!

Fake PC Repair warnings:


Related malware:

PC Repair removal instructions:

1. First of all, you need to unhide the files and folders. Select Run... from the Start Menu or just hit the key combination CTRL+R on your keyboard. In the Open: field, enter cmd and hit Enter or click OK.


At the command prompt, enter attrib -h /s /d and hit Enter. Now, you should see all your files and folders. NOTE: you may have to repeat this step because the malware may hide your files again.


If you still can't see any of your files, Select Run... from the Start Menu or just hit the key combination CTRL+R on your keyboard. In the Open: field, enter explorer and hit Enter or click OK.


2. Open Internet Explorer. Select Run... from the Start Menu or just hit the key combination CTRL+R on your keyboard. In the Open: field, enter iexplore.exe and hit Enter or click OK. Download free anti-malware software from the list below and run a full system scan.
NOTE: in some cases the rogue program may block anti-malware software. Before saving the selected program onto your computer, you may have to rename the installer to iexplore.exe or winlogon.exe With all of these tools, if running Windows 7 or Vista they MUST be run as administrator. Launch the program and follow the prompts. Don't forget to update the installed program before scanning.

3. Open Internet Explorer and download TDSSKiller or Backdoor.Tidserv Removal Tool. This malware usually (but not always) comes bundled with TDSS rootkit. Removing this rootkit from your computer is very important (if exists). Run TDSSKiller or Backdoor.Tidserv Removal Tool to remove the rootkit.


Associated PC Repair files and registry values:

Files:

Windows XP:
  • %AllUsersProfile%\Application Data\[SET OF RANDOM CHARACTERS]
  • %AllUsersProfile%\Application Data\[SET OF RANDOM CHARACTERS].exe
  • %UsersProfile%\Desktop\PC Repair.lnk
  • %UsersProfile%\Start Menu\ProgramsPC Repair
  • %UsersProfile%\Start Menu\Programs\PC Repair\PC Repair.lnk
  • %UsersProfile%\Start Menu\Programs\PC Repair\UninstallPC Repair.lnk
%AllUsersProfile% refers to: C:\Documents and Settings\All Users
%UserProfile% refers to: C:\Documents and Settings\[User Name]

Windows Vista/7:
  • %AllUsersProfile%\[SET OF RANDOM CHARACTERS]
  • %AllUsersProfile%\[SET OF RANDOM CHARACTERS].exe
  • %UsersProfile%\Desktop\PC Repair.lnk
  • %UsersProfile%\Start Menu\Programs\PC Repair\
  • %UsersProfile%\Start Menu\Programs\PC Repair\PC Repair.lnk
  • %UsersProfile%\Start Menu\Programs\PC Repair\Uninstall PC Repair.lnk
%AllUsersProfile% refers to: C:\ProgramData
%UserProfile% refers to: C:\Users\[User Name]

Registry values:
  • HKEY_CURRENT_USER\Software\Microsoft\Windows\CurrentVersion\Run "[SET OF RANDOM CHARACTERS].exe"
  • HKEY_CURRENT_USER\Software\Microsoft\Windows\CurrentVersion\Run "[SET OF RANDOM CHARACTERS]"
  • HKEY_CURRENT_USER\Software\Microsoft\Windows\CurrentVersion\Policies\Associations "LowRiskFileTypes" = '/{hq:/s`s:/ogn:/uyu:/dyd:/c`u:/bnl:/ble:/sdf:/lrh:/iul:/iulm:/fhg:/clq:/kqf:/`wh:/lqf:/lqdf:/lnw:/lq2:/l2t:/v`w:/rbs:'
  • HKEY_CURRENT_USER\Software\Microsoft\Windows\CurrentVersion\Policies\Attachments "SaveZoneInformation" = '1'
  • HKEY_CURRENT_USER\Software\Microsoft\Internet Explorer\Download "CheckExeSignatures" = 'no'
  • HKEY_CURRENT_USER\Software\Microsoft\Internet Explorer\Main "Use FormSuggest" = 'yes'
Share this information with other people:

How to Remove OpenCloud Antivirus (Uninstall Guide)

Don't Copy From This Blog...

Protected by Copyscape Plagiarism Detection
OpenCloud Antivirus is a rogue anti-virus program that will tell you that your computer is infected with spyware, Trojans or other viruses which is a lie and that you should immediately purchase the program to remove viruses that do not even exist. Unfortunately, it's so generic looking and doesn't have a lot of bells that could make users think it was odd, that's why it's rather easy to fall victim to this scam. The rogue program generates totally misleading pop-ups that look like legitimate warnings from antivirus or antispyware software. Victims usually begin to panic and that's actually the wrong reaction to have. You need to stay calm; otherwise it's going to get even worse. Cyber criminals are using sophisticated tactics to trick unsuspecting computer users into downloading or purchasing potentially dangerous and rogue software. Although, OpenCloud Antivirus is a typical scareware, it can't delete your files or steal your credit card information, unless you've purchased it, however, you still need to remove OpenCloud Antivirus from your computer as soon as possible. If your computer became hijacked by this scareware, please follow the removal instructions below.


OpenCloud Antivirus is quite a bit more aggressive than the previous versions from the same scareware family: Wolfram Antivirus, BlueFlare Antivirus and Milestone Antivirus. It performs fake system scan and detects exactly the same infections on entirely different computers. It's a false claim meant to extort money out of you. What is more, Open Cloud Antivirus sets up a proxy server for your LAN connection and either blocks certain websites or redirects to malicious or infected websites. It also blocks legitimate applications claiming that they are infected or hijacked by malicious software, usually spyware or a Trojan horse.
Security warning:
The file C:\WINDOWS\regedit.exe is infected.
Running of application is impossible.


There is also this fake Windows security alerts stating that a Zeus Trojan is requests an unauthorized access to your computer.
Windows Security Alert
To help protect your computer, Windows Firewall has blocked some features of this program.
Do you want to keep blocking this program?
Zeus Trojan


And there's another one claiming that the svchost.exe process was replaced with malicious one. OpenCloud Antivirus creates an autorun registry entry to run a file called csrss.exe every time Windows starts. Please do not confuse it with the legitimate one which resides in C:\Windows\System32\csrss.exe. The Trojan file then loads the main OpenCloud Antivirus executable OpenCloud Antivirus.exe.

If you can't use your web browser or and run your favorite malware scanner, you can activate the rogue program by entering this registration code: DB038748-B4659586-4A1071AF-32E768CD-36005B1B-F4520642-3000BF2A-04FC910B. Once this is done, you are free to install anti-malware software and remove the rogue anti-virus program from your computer properly. To remove OpenCloud Antivirus and associated malware from your computer, please follow the removal instructions below. Good luck and be safe online!


OpenCloud Antivirus removal instructions:

1. Reboot your computer is "Safe Mode with Networking". As the computer is booting tap the "F8 key" continuously which should bring up the "Windows Advanced Options Menu" as shown below. Use your arrow keys to move to "Safe Mode with Networking" and press Enter key. Read more detailed instructions here: http://www.computerhope.com/issues/chsafe.htm


NOTE: Login as the same user you were previously logged in with in the normal Windows mode.

2. Launch Internet Explorer. In Internet Explorer go to: Tools→Internet Options→Connections tab. Click Lan Settings button and uncheck the checkbox labeled Use a proxy server for your LAN. Click OK. You may have to repeat steps 1-2 if you will have problems downloading malware removal programs.


3. Download free anti-malware software from the list below and run a full system scan.
NOTE: in some cases the rogue program may block anti-malware software. Before saving the selected program onto your computer, you may have to rename the installer to iexplore.exe or winlogon.exe With all of these tools, if running Windows 7 or Vista they MUST be run as administrator. Launch the program and follow the prompts. Don't forget to update the installed program before scanning.


Alternate OpenCloud Antivirus removal instructions:

1. Go to StartRun or press WinKey+R. Type in "command" and press Enter key.


2. In the command prompt window type "notepad". Notepad will come up.

3. Copy all the text in blue color below and paste into Notepad.

Windows Registry Editor Version 5.00
[HKEY_CLASSES_ROOT\exefile\shell\open\command]
@="\"%1\" %*"

4. Save file as regfix.reg to your Desktop. NOTE: (Save as type: All files)

regfix.reg is available for download here, in case you can't make your own or it doesn't work. 

5. Double-click on regfix.reg file to run it. Click "Yes" for Registry Editor prompt window. Then click OK.
6. Download free anti-malware software from the list below and run a full system scan.
NOTE: in some cases the rogue program may block anti-malware software. Before saving the selected program onto your computer, you may have to rename the installer to iexplore.exe or winlogon.exe With all of these tools, if running Windows 7 or Vista they MUST be run as administrator. Launch the program and follow the prompts. Don't forget to update the installed program before scanning.


Associated OpenCloud Antivirus files and registry values:

Files:

Windows XP:
  • C:\Documents and Settings\[UserName]\Application Data\OpenCloud Antivirus\OpenCloud Antivirus.exe
  • C:\Documents and Settings\[UserName]\Application Data\OpenCloud Antivirus\csrss.exe
  • C:\Documents and Settings\[UserName]\Application Data\OpenCloud Antivirus\wf.conf
  • C:\Documents and Settings\[UserName]\Application Data\OpenCloud Antivirus\sysl32.dll
Windows Vista/7:
  • C:\Users\[UserName]\AppData\Roaming\OpenCloud Antivirus\OpenCloud Antivirus.exe
  • C:\Users\[UserName]\AppData\Roaming\OpenCloud Antivirus\csrss.exe
  • C:\Users\[UserName]\AppData\Roaming\OpenCloud Antivirus\wf.conf
  • C:\Users\[UserName]\AppData\Roaming\OpenCloud Antivirus\sysl32.dll
Registry values:
  • HKEY_CURRENT_USER\Software\Microsoft\Windows NT\CurrentVersion\Windows "load"="%Temp%\csrss.exe"
Share this information with other people:

Friday, August 26, 2011

How to Remove HDD Repair (Uninstall Guide)

Don't Copy From This Blog...

Protected by Copyscape Plagiarism Detection
HDD Repair is a rogue computer repair program that will make it appear that your system has some serious hard disk drive and Windows registry problems. It will display legitimate looking pop-up windows warning you of the dangers of bad sectors on your hard drive, RAM failures and registry errors to trick you into paying to fix fictitious system errors. In general, HDD Repair is a bogus program you never intended to install and that's why you should remove it from your computer. It reports finding dozens of supposedly critical system errors that don't actually exist. There are a number of ways that such rogue software gets on your computer, but infections usually occur when you visit infected websites. Cyber criminals also use fake alerts that indicate that your computer is infected (could be generated by a Trojan), infected files on peer-to-peer networks, drive-by-downloads or even malicious email attachments. If have this rogue system repair program running on your computer, please follow the steps in the removal guide below to remove HDD Repair and associated malware from your computer.


There are numerous things to keep in mind when removing HDD Repair. First, of all, do not delete any files from Temp folder either manually or using such system cleaners as CCleaner. The rogue programs moves software shortcuts from various locations to %Temp%\smtmp folder. If you delete the smtmp folder, you will lose your software and system shortcuts. Secondly, HDD Repair may turn your Dekstop background black and hide the rest of files. Thirdly, this rogue program may drop a rootkit, very often TDL4 from the TDSS family. It may drop other type of malware too. You can use TDSSKiller to check whether your computer is infected with a rootkit or not.

Fake HDD Repair warnings:


Additionally, you can activate the rogue program by entering this registration code 8475082234984902023718742058948 and any email as shown in the image below.


Once this is done, you are free to install anti-malware software and remove the rogue anti-virus program from your computer properly. And remember, do not purchase HDD Repair. If you have already bought it, please contact your credit card company and dispute the charges. If you have any questions or need additional help removing HDD Repair, please leave a comment below or email us. Compute wisely!


HDD Repair removal instructions:

1. First of all, you need to unhide the files and folders. Select Run... from the Start Menu or just hit the key combination CTRL+R on your keyboard. In the Open: field, enter cmd and hit Enter or click OK.


At the command prompt, enter attrib -h /s /d and hit Enter. Now, you should see all your files and folders. NOTE: you may have to repeat this step because the malware may hide your files again.


If you still can't see any of your files, Select Run... from the Start Menu or just hit the key combination CTRL+R on your keyboard. In the Open: field, enter explorer and hit Enter or click OK.


2. Open Internet Explorer. Select Run... from the Start Menu or just hit the key combination CTRL+R on your keyboard. In the Open: field, enter iexplore.exe and hit Enter or click OK.

Download free anti-malware software from the list below and run a full system scan.
NOTE: in some cases the rogue program may block anti-malware software. Before saving the selected program onto your computer, you may have to rename the installer to iexplore.exe or winlogon.exe With all of these tools, if running Windows 7 or Vista they MUST be run as administrator. Launch the program and follow the prompts. Don't forget to update the installed program before scanning.

3. Open Internet Explorer and download TDSSKiller or Backdoor.Tidserv Removal Tool. This malware usually (but not always) comes bundled with TDSS rootkit. Removing this rootkit from your computer is very important (if exists). Run TDSSKiller or Backdoor.Tidserv Removal Tool to remove the rootkit.


Alertane HDD Repair removal instructions:

1. First of all, you need to unhide the files and folders. Select Run... from the Start Menu or just hit the key combination CTRL+R on your keyboard. In the Open: field, enter cmd and hit Enter or click OK.


At the command prompt, enter attrib -h /s /d and hit Enter. Now, you should see all your files and folders. NOTE: you may have to repeat this step because the malware may hide your files again.


2. The rogue application places an icon or your desktop. Right click on the icon, click Properties in the drop-down menu, then click the Shortcut tab.


The location of the malware is in the Target box.


On computers running Windows XP, malware hides in:
C:\Documents and Settings\All Users\Application Data\

NOTE: by default, Application Data folder is hidden. Malware files are hidden as well. To see hidden files and folders, please read Show Hidden Files and Folders in Windows.

Under the Hidden files and folders section, click Show hidden files and folders, and remove the checkmark from the checkbox labeled:

- Hide extensions for known file types
- Hide protected operating system files

Click OK to save the changes. Now you will be able to see all files and folders in the Application Data directory.

On computers running Windows Vista/7, malware hides in:
C:\ProgramData\

3. Look for suspect ".exe" files in the given directories depending on the Windows version you have.

Example Windows XP:
C:\Documents and Settings\All Users\Application Data\16441124.exe
C:\Documents and Settings\All Users\Application Data\fWpYMRQgdRYv.exe

Example Windows Vista/7:
C:\ProgramData\16441124.exe
C:\ProgramData\fWpYMRQgdRYv.exe

Basically, there will be a couple of ".exe" file named with a series of numbers or letters.


Rename those files to 16441124.vir, fWpYMRQgdRYv.vir etc. For example:


It should be: C:\Documents and Settings\All Users\Application Data\16441124.vir

Instead of: C:\Documents and Settings\All Users\Application Data\16441124.exe

4. Restart your computer. The malware should be inactive after the restart.

5. Open Internet Explorer and download TDSSKiller or Backdoor.Tidserv Removal Tool. This malware usually (but not always) comes bundled with TDSS rootkit. Removing this rootkit from your computer is very important (if exists). Run TDSSKiller and remove the rootkit.


6. Download free anti-malware software from the list below and run a full system scan.
NOTE: in some cases the rogue program may block anti-malware software. Before saving the selected program onto your computer, you may have to rename the installer to iexplore.exe or winlogon.exe With all of these tools, if running Windows 7 or Vista they MUST be run as administrator. Launch the program and follow the prompts. Don't forget to update the installed program before scanning.

7. New threats appear every day. In order to protect your PC from such (new) infections we strongly recommend you to use ESET Smart Security.


Associated HDD Repair files and registry values:

Files:

Windows XP:
  • %AllUsersProfile%\Application Data\[SET OF RANDOM CHARACTERS]
  • %AllUsersProfile%\Application Data\[SET OF RANDOM CHARACTERS].exe
  • %UsersProfile%\Desktop\HDD Repair.lnk
  • %UsersProfile%\Start Menu\Programs\HDD Repair
  • %UsersProfile%\Start Menu\Programs\HDD Repair\HDD Repair.lnk
  • %UsersProfile%\Start Menu\Programs\HDD Repair\Uninstall HDD Repair.lnk
%AllUsersProfile% refers to: C:\Documents and Settings\All Users
%UserProfile% refers to: C:\Documents and Settings\[User Name]

Windows Vista/7:
  • %AllUsersProfile%\[SET OF RANDOM CHARACTERS]
  • %AllUsersProfile%\[SET OF RANDOM CHARACTERS].exe
  • %UsersProfile%\Desktop\HDD Repair.lnk
  • %UsersProfile%\Start Menu\Programs\HDD Repair\
  • %UsersProfile%\Start Menu\Programs\HDD Repair\HDD Repair.lnk
  • %UsersProfile%\Start Menu\Programs\HDD Repair\Uninstall HDD Repair.lnk
%AllUsersProfile% refers to: C:\ProgramData
%UserProfile% refers to: C:\Users\[User Name]

Registry values:
  • HKEY_CURRENT_USER\Software\Microsoft\Windows\CurrentVersion\Run "[SET OF RANDOM CHARACTERS].exe"
  • HKEY_CURRENT_USER\Software\Microsoft\Windows\CurrentVersion\Run "[SET OF RANDOM CHARACTERS]"
  • HKEY_CURRENT_USER\Software\Microsoft\Windows\CurrentVersion\Policies\Associations "LowRiskFileTypes" = '/{hq:/s`s:/ogn:/uyu:/dyd:/c`u:/bnl:/ble:/sdf:/lrh:/iul:/iulm:/fhg:/clq:/kqf:/`wh:/lqf:/lqdf:/lnw:/lq2:/l2t:/v`w:/rbs:'
  • HKEY_CURRENT_USER\Software\Microsoft\Windows\CurrentVersion\Policies\Attachments "SaveZoneInformation" = '1'
  • HKEY_CURRENT_USER\Software\Microsoft\Internet Explorer\Download "CheckExeSignatures" = 'no'
  • HKEY_CURRENT_USER\Software\Microsoft\Internet Explorer\Main "Use FormSuggest" = 'yes'
Share this information with other people:

 
//PART 2